Defining Preferences
- To get to this screen, type businesspreferences into the Convobar, or go to Business Settings > Business Preferences.
- Select a category's tile to jump to those options:
Note: The override icon ![]() appears beside any field that deviates from the default setting. Select that icon to revert the field back to its default value. The disabled icon
appears beside any field that deviates from the default setting. Select that icon to revert the field back to its default value. The disabled icon ![]() means another option needs to be enabled elsewhere at a higher level in Meevo for the current option to take effect.
means another option needs to be enabled elsewhere at a higher level in Meevo for the current option to take effect.
Appointment
- Default Column Zoom and Default Time Zoom: Determine the default views in Appointment Book. A higher zoom percentage means everything will appear larger, but less of the Appointment Book is displayed on-screen.
- Appointment Book Interval: This option determines the bookable time slots in the Appointment Book, the available increments in any form where you can configure a length of time, and start/end time increments, such as what is in Appointment Editor. It is highly recommended that you review More on Intervals and Precision Timing for details before changing these settings.
- Enable Precision Timing (available only if Appointment Book Interval is set to 10 or 15): If this option is enabled, the Precision Timing button becomes available in the Appointment Book, which zooms-in on the book to display 5-minute increments. Enabling this option also allows you to keep a 10- or 15-minute book while using 5-minute increments in other data items in Meevo. We recommend that you review More on Intervals and Precision Timing for details before changing these settings.
- Default Appointment Book View: Allows you to set the default view of the Appointment Book (that is, the view when it is first opened) to Employee View or Resource View.
- Note that employee profiles also offer a Default Appointment Book View option, but that is an employee-specific option for choosing a type of Employee View (My Day, My Week, All, etc.).
- If the Default Appointment Book View option on an employee's profile is set to anything other than All, the Appointment Book will always default to the Employee View for that employee, regardless of this Business Preferences setting.
- Limit the ability to book an appointment unless there are ___ employees available for the duration of the service: Determines how many service providers must be available for booking after an appointment is booked. For example, if you enter 2 here, then you will need at least three available service providers to book an appointment: one service provider for the appointment, and two service providers that remain available. This setting applies to both the Appointment Book and Online Booking. Enter 0 to disable this setting.
Note: Only an Event can override this setting. Otherwise you will not be able to book an appointment if this value is not met.
- Enable Convobar appointment suggestions: Turns on Convobar suggestions, which provide a list of the earliest available openings based on your Convobar search.
- Require selection of an Appointment Category when booking an appointment: When enabled, makes the Appointment Category drop-down in the Appointment Editor a required field.
- Show Anonymous Client option in Appointment Editor: Turns the Anonymous Client option on and off in the Appointment Editor. When this option is selected, you can book an appointment for anonymous client.
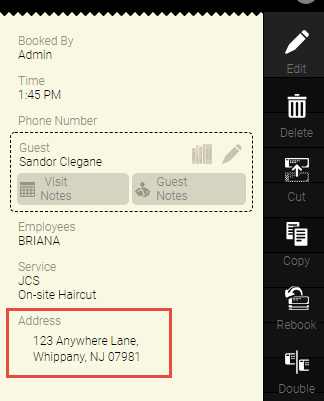
- Expose Address Required section in service definitions: Reveals the Required address in Appointment Editor option in Service definitions. If Required address in Appointment Editor is selected in a service definition, then selecting that service in Appointment Editor automatically displays required address fields. Upon save, the address will appear in the appointment. This option is useful for providers who travel to appointments.
When Required address in Appointment Editor is enabled on a service definition, the appointment address becomes a mandatory field in the Appointment Editor if that service is being booked. If the client has an address on the profile, that address gets pulled into the Appointment Editor, but it can be edited. If no address is on the profile, it must be filled in on the Appointment Editor. In either case, you cannot save the appointment without an appointment address. Note editing the address on the appointment does not update the address on the client profile.
Below, the On-site Haircut service has Required address in Appointment Editor enabled in its definition, so when that service is added to the Appointment Editor, the address fields are revealed. Meevo brings in the address from the client's profile.

There are two other options in > Preferences that, when enabled, will enhance the Expose address required section in service definitions option:
- If Show location city and zip on appointment is enabled, the appointment's city and ZIP code will appear on the appointment:
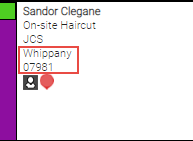
- If Show client address on Smart Assistant is enabled, the address will appear in the appointment's Smart Assistant:
- Show location city and zip on appointment: Displays the appointment location's city and zip code in the Appointment Book appointment. See the previous option for details on how this works.
- Show Client Address on Smart Assistant: Displays the appointment address in the Appointment Book Smart Assistant. See Step 7 for details on how this option works.
- Show Running Late, Late, or Left Early indicator when scheduled Work Activity is "Must Clock In": Enable this option to display indicators in the appointment book that identify employees who are late or who left early for a scheduled, “must clock-in” Work Activity. Color-coded shading and text will appear on an employee’s scheduled time. See About the Appointment Book for details on these indicators and the associated Work Activity settings.
- Show the number of resources/employees available when viewing the Resource/Appointment Book: Adds a column to the right of the time column that indicates how many resources (when in Employee view) or employees (when in Resource view) are available at that time. In the example below, only one resource is available at 12:45 pm, but four are available starting at 1 pm.

- Enable strict resource assignment when booking appointments: Enable this option if you wish for employees to remain scheduled in a specific resource, even if it is not available for some reason. When enabled, this option prevents: 1. auto-assignment of a resource when an employee is already scheduled in it, and 2. booking an employee in a resource other than the one they are scheduled in.
- Only display services in the Appointment Editor that the employee can perform or that can be performed in the resource: When enabled, the Services drop-down in Appointment Editor will only display services that are configured as Can Perform by the selected employee or resource.
- Use gender preference when booking appointments: Reveals the Force gender preference when booking an appointment field in the Services definition form, and reveals the Gender field in Appointment Editor for each service that has this option enabled.
- Display employee gender indicator in appointment book: This option controls whether the employee gender icon appears at the top of their Appointment Book column.

- When booking an appointment in the Appointment Editor, appointments will: This option determines whether the Requested checkbox will be selected by default when booking in the Appointment Book. If you select Require selection of Request / Non-Request,the Requested checkbox becomes a drop-down and a required field in the Appointment Editor.
- Move back-to-back services as a group: If an appointment has multiple services that are scheduled back-to-back, and you change the start time or date of the first service in the appointment, then the start time/date of the other services will also update automatically. This setting ensures that back-to-back services in an appointment are not broken up if you change the start time or date of the first service.
- Enable ability to adjust appointment length and block duration by dragging the end time: When this is enabled, selecting an appointment or block highlights the bottom line magenta, which indicates that it can be dragged to adjust the service step length / block duration. If you enable this option, we recommend reviewing your Appointment Category/Service Category colors to ensure that the magenta highlight (shown below) will not get lost in any magenta-like colors.

- Automatically mark appointments as no show after ___ minutes past the scheduled time: Defines how much time will elapse after the scheduled appointment start time before Meevo changes the appointment status to No Show.
- Default fee that will be charged when an appointment is flagged as a No-Show: The percentage to charge a no-show client for each service in the appointment. Employees receive commission on the no-show fee; commission is calculated based on the employee's service commission settings.
- Prompt to confirm moving an appointment when using drag and drop on a mobile device: When this option is enabled, Meevo displays a confirmation message if you attempt to drag and drop an appointment on a mobile device. Enable this prompt to prevent users from accidentally moving appointments on a mobile device.
- Enable Intelli-Booking: Turns on Intelli-Booking at the business level. Intelli-Booking allows you to store service timings that are unique to a client, so when the client is booked with the configured employee and service, those client-specific timings will be automatically used in the Appointment Book. When this option is enabled, new employee profiles and new service definitions will also have the Intelli-Booking option set to "on" by default. See Using Intelli-Booking for complete details, including streamlined steps for enabling this feature.
- Show Cancel/ No Show indicator if the client has canceled or no-showed for an appointment within the last __ weeks: When enabled, a passive alert will appear above the client name in the usual places (Appointment Editor, Client Find, Register, etc.). This alert shows how many times the client has canceled or no-showed within the configured amount of time.
- Calendar week start day: Determines which day starts a new week in Appointment Book (applies to Week View when in Employee View) and Schedule Manager.
- Scan for opening result options: Define how many random employees should appear in Meevo Scan for Opening results. This option applies to all Meevo modules that use Scan for Opening. If you select Multiple, define exactly how many openings should appear per time slot using the option below (Limit the number...).
- Limit the number of openings available per time slot to __: This option appears if you select Multiple in the option above; here you select how many results should appear.
- Prompt to add a card on file to a client's profile when booking appointments: If the client selected in the Appointment Editor’s Paying Client field does not have a credit card on their profile, Meevo will display a prompt asking if you want to add one. For this to occur, this Business Information setting must be enabled, and the logged-in user booking the appointment must have Grant access to the Data > Client > Credit Cards security key. Enabling this prompt is a way of encouraging front desk workers to add a client credit card on file, which can make collecting cancellation and no-show fees much easier.
- Allow clean-up time to overlap with off time: When this option is enabled, Scan will return openings for an employee even if a clean-up step extends beyond the employee's bookable hours. For example, say you are looking for an opening for a service with a 60 minute service step and a 15 minute clean-up step. An employee who is bookable until 5 pm will appear in Scan results for a 4-5 pm slot, as the 15-minute clean-up step won't be considered by the Scan engine. Also, in the Appointment Book, the "conflicts with employee's time off" warning will not appear if you are manually booking in that same scenario.
- Start time can overlap with the clean-up time of the previous appointment for the same client if they are using the same employee and/or the same or no resource:This option ignores all cleaning gaps between services when a client wants to book back-to-back services with the same employee and/or same (or no) resource. This ensures the client isn't forced to wait between services, and ensures the business doesn't lose bookable time. Also, in the Appointment Book, the "double-booking" warning will not appear if you are manually booking in that same scenario.
- Primary Appointment Style: Determines whether Appointment Category or Service Category controls the color of the appointment background. Whichever is selected, the other will control the color of the bar on the left.
Note: When Use Service Category is configured as the Primary Appointment Style, Meevo will automatically update the text color on an appointment to ensure it can be read. To do this, Meevo looks at the brightness of the appointment background color and then updates the appointment text to black or white accordingly using W3C standards.
Work Ticket Options
Note: These options affect receipt work tickets, the AQ020 report, and the AQ022 report.
- Show prices for appointments booked: Displays prices for today's services. Prices first go by employee-specific pricing if it exists; otherwise, Meevo uses service definition pricing. This appears in the Today's Appointments section of the AQ020 and AQ022.
- Show Transaction History: Displays service and retail transaction history on the ticket.
- Show pricing for previously purchased items: This option appears if you enable the one above it. When Show Pricing is enabled, work ticket Transaction History will display service and retail prices that were paid at the register. This appears in the History section of the AQ020 and AQ022.
- Show Visit Notes on the work tickets: Displays visit notes on client receipt work tickets, the AQ020 report, and the AQ022 report.
- Only display visit note types matching services booked: Limits the report only to Visit Note Types that are associated with the booked services (according to the service definition).
- Display all visit note types regardless of service booked: Displays all Visit Note Types even if they are not associated with booked services.
- Receipt Work Ticket Only: Print one ticket per employee for clients with multiple appointments: If two different employees have two different appointments with the same client on the same day, enabling this option will print two separate work tickets (one for each employee). If this option is disabled, only one work ticket is printed. This option affects Receipt Work Tickets only.
- Receipt Work Ticket Only: Prompt to check-in appointment when printed: After printing the Receipt Work Ticket, you are prompted via a pop-up window to check the client. This option affects Receipt Work Tickets only.
Booking Agent
- Allow Specific Employee: Reveals the Employee Selection option Specific Employee in Booking Agent.
- Hide Any Male/Any Female: Hides the Employee Selection options Any Male Employee and Any Female Employee in Booking Agent.
- Show employee name when openings are displayed: Displays employee names in Booking Agent scan results.
- Do not allow appointments to be booked within ___ hours of the current time: This setting is essentially a buffer that defines the earliest appointment opening that Booking Agent can return. For example, if this option is set to 1 and you run a search in Booking Agent at 10 am, the earliest possible appointment opening that Booking Agent can return is 11 am.
Perpetual Standings
These two options apply to Standing Appointments that are set to Is perpetual.
- Clients should have at least __ standing appointments booked in the future: The minimum number of appointments for a perpetual standing appointment. When an appointment is marked as no-show, canceled, or checked out, an appointment is automatically booked to satisfy this setting.
- Client standing appointments should be booked for at least the next __ months in the future: The minimum number of months appointments get booked in the future for it to be considered a perpetual standing appointment. If an appointment is canceled or checked out, a future appointment is automatically booked to satisfy this setting. As a best practice, we recommend setting this option to 3 months.
Resources
Reorder resources every ___ months: Determines how frequently the priority list of resources is reordered. When you add a service, you can associate resources (such as rooms or chairs) with that service. Enabling automatic reordering of this list helps ensure that your resources receive an equal amount of use.
For example, if a particular service has a list of 6 potential chairs (resources) but the order of the resource list never changes, Chair 1 may get too much use, while Chair 6 may not get much use at all. The reordering simply flips, or mirrors, the list. In a list of 6 chairs, Chair 6 becomes Chair 1, Chair 5 becomes Chair 2, etc. If set to 0, the list is not reordered.
Note: You must enable the Automatically Reorder option in the Resource definition for the resource to be eligible for reordering.
Note: You can manually reorder a resource list via the Services > Resources screen. See Assigning a Resource to a Service for more information.
Wait List
These options are tied to the Wait List:
- Display the client's primary phone number in the Wait List: Displays the client phone number under the client name in the Wait List.
- Expire appointment requests ___ days after requested date range: Determines how many days should pass after the End Date of the request date range before a Wait List appointment request expires. Requests that linger on the Wait List beyond the time frame configured here will be considered Archived. An expired Wait List request is automatically logged as a Missed Opportunity.
- Maximum number of days someone can be placed on the Wait List: Limits the range between the Start Date and End Date of an appointment request. Note that if you need to set this option higher than 30 days, contact Business Support for guidance; we can adjust this option to up to 90 days.
- A client can be added to the Wait List only within the next ___ months: Determines how far in advance from today that an appointment Start Date can be created for a client. For example, if this setting is configured as 2 months, then the appointment request Start Date for a given client cannot be later than 2 months from today.
- Nonresponsive pending requests may be cleared from the book after ___ minutes: Time, in minutes, that a wait-listed client has to respond to an appointment request before the Wait List scan removes the appointment from the Appointment Book. This setting applies to clients who opted into text message notifications.
- Wait list openings cannot occur within ___ minutes of an opening rejected by the client: This refers to how Meevo handles appointment requests after a wait-listed client rejects a pending request. If the client rejects or does not respond to an appointment request, the next earliest appointment time the client can book depends on what is entered here. For example, if this is set to 30 minutes and a client rejects a 9 am appointment, the earliest next appointment the client can book is 9:30 am, assuming that the time slot is available.
- Do not send a wait list opening to a client within ___ hours of the current time: Clients on the wait list will not be notified of appointment openings that become available within this many hours of the current time. For example, if the current time is 9:45 am and an opening for 11 am just became available, clients would not receive a notification if this option was set to 2 hours or greater. If this option was set to 1 hour, the notifications would go out, since the next appointment is beyond the 1 hour restriction. If this option is set to 0 hours, clients will receive notifications for any appointment that becomes available in the future, regardless of how close it is to the current time.
Clients
- Allow members of a defined family to share points for redemption: When enabled, any member of a family can redeem a family member's points. If this option is enabled and Allow the viewing/redemption of points across all locations is enabled under the Points section, then family members can redeem other family members' points across locations.
- Client names are displayed as and sorted by: Sorts clients anywhere there is a searchable client list according to Last Name, First Name or First Name, Last Name.
- Enable bulk update functionality for notification settings: When this option is enabled, bulk update functionality becomes available in Notification Settings. Enable this option to allow Meevo users to perform bulk notification updates to client profiles.
- Enable clients to opt out of selling or sharing of personal information: Enable this setting to reveal an "opt-out" option in client profiles and on the client-facing Online Booking and eGift sites. If your business collects and shares/sells customer information, you'll need to enable this option so that Online Booking and e-Gift clients have the opportunity to opt themselves out.
- Do Not Sell or Share My Personal Data Explanation: This explanation appears below the Do not sell or share my personal information option on the client-facing OB site. Your explanation should be clear regarding the ramifications of them not opting out of the selling/sharing of their personal info.
- Enable Purging: When this option is enabled, a Purge button will appear along the bottom of the client profile, allowing you to de-identify client data. See Purging Client Data for more information.
- Require selection of a Gender option when adding or editing a client: Makes the Gender field in the Client profile a required field. This also makes the Gender field required for profiles created through Online Booking.
- Purge credit cards on file when there are __ months or more of no activity: Purges credit cards on file if there has been no client activity for at least the selected number of months. “No activity” means that the client had no Appointment Book updates or transactions. Clients who have a future appointment on the Appointment Book or who are on the Wait List are not affected by this option either, regardless of their period of inactivity. Only credit cards on the client profile's Credit Card tab are affected by this option; cards associated with features that require recurring payments, such as Memberships, are not affected.
- Require email address / phone number / birthday / referral type when saving a new client: Makes that field required in the Client profile; the field must be filled out in order to save the profile. Client Intake Forms and Docs & Forms honor these settings as well.
- Require the selection of referral source when saving a new client: Makes required the additional field that appears when Client or Employee Referral Types are selected.
- Hide 'Use for phone confirmation' checkbox: This option is for businesses who don't make confirmation phone calls. Enabling this option:
- Hides the Use for phone confirmation checkbox that appears below Home phone numbers in a client profile.
- Hides the Confirm by phone option in Confirmation Manager.
- Hides the Call Me phone confirmation checkbox from clients in Online Booking and eGift.
- Require restricted client profiles to be unlocked in order to be unrestricted: Users will be unable to edit or unrestrict a restricted profile unless Unlock is selected first on the profile. When this option is enabled, the Restricted checkbox on a client profile will update to Restricted (must be unlocked to remove restricted flag). Depending on your business model, you may want to apply security to the Unlock button so that management-level approval is required to unlock, unrestrict, and then edit a profile. See Restricting a Client Profile for more details on restricted client profiles.

- Restricted client profiles can only be unrestricted by the location that restricted it: Only the location that restricted the profile can unlock it.
- Restricted client profiles cannot be edited: Restricted client profiles cannot be updated in any way within Meevo unless they are first unrestricted. Note that client-facing applications such as Docs & Forms, eGift, and some integrations will still be able to update restricted client profiles.
- When Minor is selected, a Parent/Guardian must be specified: Makes Client a required field in the Parent/Guardian section of a client's profile when Minor is also selected. All notifications will go to the selected parent/guardian, not the minor.
- Enable bulk update functionality for notification settings: When this option is enabled, bulk update functionality becomes available in Notification Settings. Enable this option to allow Meevo users to perform bulk notification updates to client profiles.
- Select Use for Text Marketing when creating a new client profile: The Use for text marketing option is enabled by default when creating a new client profile.
Employee
License and Insurance
- Show employee license and insurance expiration prompts in employee schedules: Enables prompts in Schedule Manager that warn you when an employee's license or insurance are about to expire. Select this option to expose an additional option below.
- Also notify if license and/or insurance will expire within ___ days of scheduled appointment: Determines how long before expiration the prompt will appear.
Account and Password
- Automatically lockout user after ___ minutes of inactivity: Automatically locks the user out of Meevo if it is idle for the duration of time configured here. The minimum duration you can choose in this field is 1 minute.
- This option sets the default value for the identically-labeled option in new employee profiles.
- Lockouts do not apply to the Self Check-in Kiosk, the Walk-in Kiosk, or the Walk-in Display Monitor.
- Deselecting the checkbox beside this option turns off lockouts for all users and employees, regardless of what the lockout option is set to on a given profile.
- Even if this option is off, as a security measure, Meevo will eventually lock out any user who is inactive for 72 hours (3 days).
Note: When lockouts are enabled, Meevo looks at each individual employee profile to determine how long that employee can be idle before they are locked out. If the employee profile lockout option is set to 0, then Meevo looks at this Business Information option.
- Lock account for 30 mins after ___ failed login attempts: The number here dictates how many consecutive failed login attempts are allowed before the account becomes locked for 30 minutes. These failed attempts can occur over any amount of time: a day, week, month, etc. A successful login resets the failed login counter to zero.
- New passwords cannot be the same as the last ___ passwords: Enforces a unique password until the limit here is reached, at which point Meevo will accept old passwords.
- Notify user ___ days before password expires: Users will receive a pop-up message notifying them that their password will expire in the number of days configured here.
- Force password change every __ days: Forces employees to change their Meevo login password every x days. You can turn off forced password changes entirely by deselecting this option.
- Require email address for users/employees: Makes Email Address a required field on user/employee profiles.
Membership
- Select default employee membership: The membership selected here will be the default membership for all employees with an associated client profile. Memberships appear in this drop-down only if Employee Membership is selected in the membership definition.
- Auto generation of membership# during sale only: Restricts employees from manually entering membership number in the register at time of sale. Instead, Meevo auto-generates this number in the register.
- Default cancellation term: The default number of days between the Cancellation Date and Termination Date when canceling a membership in Membership Manager.
- Default accrued service expiration term: Length of time, in days, that an accrued service is valid after a membership expires or is terminated.
- Require email for membership sale: When enabled, clients must provide an email address before a membership can be purchased. An email address prompt appears within the register Smart Receipt.
- Set Fixed Billing Date of the Month: Choose the default day of the month on which newly created recurring payments will be scheduled.
- This setting establishes a default billing date that will appear in the Register during the sale. Users with the appropriate security permissions can modify the billing date during enrollment in the Register.
- Existing memberships are not automatically updated and will continue using their current billing schedules unless adjusted manually.
- Select a merchant account that Meevo will use to process membership payments, otherwise Meevo will use the Default Merchant Account: Select a merchant account that will be used for membership billing. If nothing is selected here, Meevo uses the default merchant account selected in the Merchant Account form. .
- Membership enrollment fees can be refunded with ___ days of purchase: The number of days after the purchase of a membership that a client can receive a full refund for the enrollment fee. A value of zero (0) means only same-day refunds are permitted.
Note: In Security Administration under Register > Refund > Memberships is the Override Days for Membership Refund key. Setting that key to grant will override this setting, meaning the user would be able to refund a membership's enrollment fee regardless of when it was sold. For a security role to honor this setting, the "Override Days" key in Security Administration must be set to Deny or Hide.
- Prompt when client CC on file is missing ZIP code: Prompts the user if the client who is added to Appointment Editor or register has an active membership but the credit card on file is missing the ZIP code.
- Automatically retry declined payments every __ days up to __ times: Configures the number of days between retry attempts (1–7 days) and the maximum number of retry attempts (1–3) for eligible declined payments. This can help recover payments automatically without requiring manual reprocessing through the EFT Control Panel or waiting for automatic billing on the next billing cycle.
- Enable Automatic Billing Service (Membership, Payment Plans, etc.): Select this option to automatically bill membership and Payment Plan clients. If this option is deselected, the billing service will not bill clients, but membership clients can continue to use their memberships. Enabling this option reveals the Disable all membership handling processes option described below.
If you are turning the billing service on, the next time it runs it will look 90 days into the past for any client payments that are in a Not Billed, Suspended, or Error state. If any are found, the billing service will attempt to re-bill those payments. The service does not take action on payments that are beyond 90 days in the past. - Disable all membership handling processes: This appears if the option above is enabled. When this option is enabled, EFTs are ignored and the billing engine does not suspend or freeze memberships. The billing engine will run its process each night, but EFTs are not billed and are given the status selected in the What status should be given... option.
- Hide expired membership indicator after __ months since expiration: This option hides the “membership expired” indicator in Membership Manager once the membership has been expired for the configured number of months.
Payment Plans
For details on configuring Payment Plan options, see Setting Up Payment Plans.
Register
General
- Send client a self-pay reminder __ hours after sending initial self-pay request: Sends a Self-Pay reminder to the client, one time, this many hours after the original notification was sent. The notifications are sent via the same method(s) as the original Self-Pay notification.
- Enable client(s) to rebook their next appointment via online booking after completing payment for a Self-Pay transaction: This adds a Book Now button to the bottom of the Self-Pay confirmation page. This encourages self-serve rebooking by reminding the client of the need to book again and by making your Online Booking site one “click” away.
- Self-Pay Default Tip %: Determines the default tip percentage on a Self-Pay transaction. During the Self-Pay transaction, clients can adjust this tip amount if needed. Note the following important details about this option:
- This option does not affect anything in Meevo if tips are disabled.
- Employees who are eligible to receive tips are guaranteed to receive at least this percentage amount, and possibly more if there are pre-paid tips being applied on the transaction.
- Allow employee-specific tipping for client(s) using Self-Pay: Enabling this option gives clients using Self-Pay a Custom option that they can select to enter a separate tip amount or percentage for each employee. When this option is not selected, overall tip amounts are proportionally distributed to each servicing employee on the ticket (default Meevo behavior).
- Self-Pay link will expire in __ hours: This determines the expiration window of any Self-Pay link. You can set this option to a minimum of 5 hours and a maximum of 168 hours, which is the default value. This option is set by Central Office and cannot be changed in a location.
- Allow Self-Pay client(s) to store credit card for future use: Enable this option to expose the Securely store credit card for future use option to clients during the Checkout step. A client who selects this option during checkout will be adding their card to their client profile's Credit Card tab.
- Allow employee tips to be refunded: Allows tips to be refunded; turning on this option enables the Tips category for refunds.
- Require employee selection for every retail item added to the Smart Receipt: Enable this option to display the "credited employee" prompt each time a retail item is added to the Smart Receipt. If this option is off, the register defaults the credited employee to the last one chosen in the transaction.
- Tips can be refunded within __ days of transaction: A tip can be refunded this many days after a transaction is finalized.
- Default refunded products to be marked as "Return to Shelf": If enabled, products being refunded automatically have the Resell? option selected in the Smart Receipt during the refund transaction. Enabling Resell? during a refund adds the product back to the on-hand count.
- Products can be refunded within ___ days of transaction: Determines how long after purchase a product can be refunded. A value of zero (0) means that only same-day refunds are permitted.
In Security Administration under Register > Refund > Product, the Allow Days for Product Refund key, if set to Grant, will override this setting, meaning the user would be able to refund a product regardless of when it was sold. The override key must be set to Deny or Hide for the security role to adhere to this Business Information setting. - Restrict cash refunds when a credit card was used for payment: Disallows any amount of cash refund if the original sale included a credit card payment. When this setting is enabled, a credit card transaction can only be refunded to a credit card, check, gift card, client account, or "other" payment type. This enhancement can prevent instances of fraud where a stolen credit card is used to make a purchase and then a cash refund is issued before the card is reported stolen.
- Show referrals since client's last visit: When you are booking or checking out a client (let's call them Client A), Meevo checks to see if Client A referred anyone since their last visit. If so (let's call them Client B), a message displays that lists Client B as a referral. For Client B to be a referral, the following must be true:
- Before the Client B's first visit, Client A was selected in the Referred by field of Client B's profile.
- Client B had their first service visit (service transaction) since Client A's last visit.
- Suppress monetary value for items remaining in a package on a receipt: When selected, the monetary value of items that remain on a package will not appear on the itemized receipt.
- Show anonymous client option: Turns the Anonymous Client options on and off in the register. When this option is selected, you can create a transaction for an anonymous client. Clients who were booked "Anonymous" will still appear as anonymous in the register, even if this register setting is turned off.
- Show product recommendations in the register: Enables automatic Product Recommendations. When a client's name is added to the register, Product Recommendations for that client automatically appear in the right pane. These recommendations are based on the purchase history of the client and the Product lasts ___ weeks with suggested use setting in the Product definition.
- Package Redemption Priority: This is normally set to FIFO (First In, First Out), which means the soonest expiring packages are redeemed first. You can set this option to LIFO (Last In, First Out) to reverse that logic and redeem the latest expiring packages first. See Redeeming Items from a Package for more details on redemption priority.
- Prompt client to Rebook their next appointment: Decide when the Rebook window should appear. See this topic for details on rebooking and Frequency of Visit settings, or see this topic for step-by-step guidance on rebooking a client.
- Prior to collecting payment: Rebook window appears when you select Pay Now in the register.
- When appointment is added to Smart Receipt: Rebook window appears when appointment is added to the Smart Receipt (for example, after selecting Checkout in the Appointment Book).
- Never: Rebook window does not appear in the register.
- Prompt to enter visit notes upon completion of a transaction for services configured with a visit note type: When you complete a transaction that includes at least one service with an associated Visit Note Type, Meevo displays a pop-up window where you can enter visit notes for each Visit Note Type on the transaction. This encourages front desk employees to enter visit notes at the end of the transaction. Note that the service must be associated with a Visit Note Type for this pop-up window to appear. To disable the Visit Note prompt in the register, turn this option off.
- Default Tip Amount Type: Determines what is selected by default in the register's tip window (Percentage or Currency).
- Percentage/Amount Tip Options: Determines the available predefined tip options (selectable tiles) in the register's tip window.
- Default tip calculations will be based upon: Determines what the register's predefined tip percentages will be calculated against: Discounted price or Non-discounted price.
- Include product sales in tip calculations: When enabled, tip percentage calculations in the register's Tip Modal include the cost of retail items, not just services. Note when this is enabled, products also adhere to the Default tip calculations... option above. Products redeemed from a package are not considered.
- Enable client account spending limit: Enable this option to set a maximum balance that clients can owe on their account. When you enter a spending limit and save, this same Limit field appears in client profiles. The value on the client profile defaults to the value in this Business Preferences setting but can be overridden on a profile-by-profile basis.
Note: If you are enabling this option, you may have to log out and log back in to see the Limit field on the client profile.
Credit Card Processing
- Enable credit card processing: This option controls the behavior of the Process button in the register. If this option is enabled, selecting Process sends the amount due to the credit card device, and the payment type is automatically detected after the client swipes or inserts the card. If this option is not enabled, selecting Process brings up the Payment Types tiles, where you must manually select the Payment Type. See About Merchant Accounts for more information.
Enabling this option hides credit and debit Payment Types from the register. This is because your processor automatically detects them during the transaction. - Disable printing of merchant credit card receipt: When selected, the merchant copy of a credit card receipt does not print.
- Allow the refunding of surcharges on eligible transactions: Enable this setting to allow MeevoPay surcharges to be refunded.
Gift Cards
- Reload a gift card with an existing balance: Allows clients to add more funds to a gift card that has an existing balance.
- Resell a gift card with a zero balance: Allows you to resell a gift card that has a zero balance.
- Enable option to auto generate a Gift Card # at the time of purchase: Reveals the Auto-generate checkbox in the register when purchasing a gift card which, when selected, automatically creates a gift card number when it is added to the Smart Receipt. This number will be masked in the Smart Receipt.
- Standard Gift Card Type expires __ weeks after purchase. A setting of "0" weeks means this gift card will not expire: The expiration date that gets filled in during the sale in the register is based on this setting. If this value is set to zero (0), then the register does not populate an expiration date, though this can be manually entered in the register during time of sale. Changing this setting only applies to Standard gift cards that are sold going forward. Existing Standard gift cards will honor the original expiration date that was configured at time of purchase.
- Default Gift Card Type: This determines the default Gift Card Type in the register. Leave this field blank to use the Standard default Gift Card Type in the register, or select a custom Gift Card Type to use as the new default. If the selected default Gift Card Type is inactivated or deleted, this field defaults back to blank (Standard).
Receipts
- Print total discounts given within a transaction: When enabled, a You saved ___! line appears after the change line on a receipt, totaling the amount saved as a results of any applied discounts.
- Do not display "Special Price" on receipts: Enable this option to hide the Special Price label any time it would appear on a receipt, be it from a manual price adjustment or a Special Price discount. The label will be hidden for both price increases and price decreases.
- Print total available points on receipts: Prints the total available points for all clients on the ticket who have a balance greater than 0.
- Do not print points value: Hides the points value from receipts so only the total points appears.
- Print points earned within a transaction on receipts: Prints the total amount of points earned from this transaction for all clients on the ticket.
- Print Gift Card Balance on receipts: Prints the remaining gift card balance on the receipt after a transaction, provided the gift card being used is associated with the client checking out. If a gift card is used during a transaction but is not associated with the client checking out, the balance will not display on the receipt.
- Number of future appointment dates to print on receipt: This setting controls how many future appointment dates will be printed on the customer receipt. Setting this to 0 disables printing of future appointments.
- Prompt to print a "Hold" receipt when a transaction is placed On-Hold: When enabled, a "Would you like to print a hold receipt?" prompt appears immediately after a transaction is placed on hold in the register. A Hold Receipt is a printout of the Smart Receipt at the time the transaction was placed on hold; you can use a Hold Receipt to provide an estimate of a potential sale to a client, or to pull a list of products that need to be gathered for purchase.
Note: Hold Receipts can be printed from Transaction Editor at any time, regardless of whether or not this option is enabled.
Points
- Enter the ratio of points to currency for your business. If you edit the point value in the ratio, the client's redeemable dollar amount will stay the same, but the client's points will be recalculated. If you edit the currency value, no changes will be made to the client's points or dollar amount.
- Any client points that have not been redeemed will be expired after ___ months of inactivity: Unredeemed points without an expiration date, regardless of when they were accrued, will expire after this many months of client inactivity. To count as "activity," there must be a register transaction or booked appointment associated with the client's profile.
- Enter 0 for no expiration date.
- Changing this value will apply to clients' existing earned points that do not have an expiration date. Points that were earned from a promotion that has an expiration configured under Redeem By will be unaffected when changing this option. See Understanding the Redeem By Field for more details.
- Allow points to be awarded on a transaction when points were redeemed: If enabled, points are awarded even if a client uses points to pay for a transaction. If not selected, no points are awarded if points are used to pay for any part of the transaction.
Service
- Number of configurable service price levels: Determines the number of Price Levels available to be configured in a service definition.
- Display Service(s) ordered alphabetically by: Determines how services are listed when viewed on client-facing sites.
Support
The Support section is where you can make the Help Desk and Live Chat available to Meevo users. For more details on these support features, see Obtaining Support for Meevo.
Help Desk Tickets
- Select Enable Help Desk Ticket Submission to make the Help Desk available to locations.
- You can also change the Custom help desk ticket submission URL to redirect the link from MSI's Help Desk to your own Ticket Submission page.
Enable live chat support
- Select Enable Live chat support to make live chat available to locations.
- You can also change the Live chat support URL to redirect the link to your own live chat URL.
System
- Load Smart Center automatically when users log in: When selected, users' Smart Centers are automatically loaded into the Meevo workspace upon login. If not selected, then upon login, users are presented with a default Meevo image.
- Enable inventory tracking to allow for negative inventory: If this option is enabled, negative on-hand values will be displayed in Meevo, and they will persist into the next day (the negative amounts are not "zeroed out" at the end of each day). If this option is not enabled, Meevo will track negative amounts for the current day only; at the end of each day, Meevo will zero out any negative amounts. For more details, see our FAQ on negative inventory.
Product Bundle counts (the Current amount in stock section of a bundle's definition) are not affected by this setting. See our Product Bundles FAQ for details on how Meevo handles negative Product Bundle counts. - Use Code128 barcodes: When this option is enabled, the DP005 report will automatically output barcodes in Code128 font and the eGift configuration screen's barcode option defaults to Code128. If this option is not enabled, the DP005 report will output barcodes in Code39 font and the eGift configuration screen's barcode option defaults to Code39.