Resources
To get to Resources, type resource into the Convobar, or go to Meevo > Data > Resources.
What is the difference between a Resource Category and a Resource?
- Resource Category: Resource Categories help with maintaining and organizing resources. A Resource Category is a required field when creating a Resource. From a Resource Category's form, you'll define which services apply to this category and choose a color scheme for a Resource's column header in the Appointment Book's Resource View.
Note: To create a Resource Category, we recommend creating Services and Service Categories in Meevo first.
- Resource: A Resource is a particular room or area within the business that is required to provide a service, such as a massage room. Assigning a resource to a service makes the service bookable in a resource, and prevents clients or employees from booking appointments at times when a service's resource is not available.
Note: To create a Resource, Resource Categories, Services, and Service Categories should be created in Meevo.
How do I associate a Resource with a Service?
Resources can be assigned to Services through the Resources or Resource Categories maintenance forms, or from the Services > Resources form. When a service is associated with a Resource or Resource Category, a resource must be selected to book that service.
How do I get a Resource to appear in the Appointment Book?
When you create a resource, it automatically appears in the Appointment Book under Resource View. Resource hours in the Appointment Book correspond with the business hours you set up in Business Information.
What are those colored dots that appear beside Resources in the Appointment Editor?
In Appointment Editor, the Resource drop-down displays resources which can have a red, yellow, or green dot beside the display name:
- Green: The resource is available and will be auto-assigned.
- Yellow: The resource is available but will not be auto-assigned. This status can occur if a client is already booked in that Resource, but the Resource has a client capacity greater than 1. In this scenario, the only way to book this Resource is to book it manually in Appointment Editor.
- Red: Resource is not available.
How does the color scheme affect the Appointment Book?
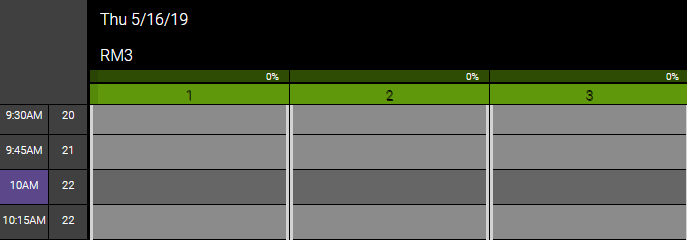
The Resource or Resource Category's color scheme controls the color of the client capacity column headers in the Appointment Book's Resource View. In the example below, Room 3's styles are set to black text with green background. There are 3 numbered columns because Room 3 has a maximum client capacity of 3.
What happens if I configure a color scheme for both a Resource Category and a Resource?
Changing a Resource's color scheme from its default (white/black) overrides the color scheme set in the Resource Category and makes the Resource's color scheme the primary one.
Adding a resource
Tip: To quickly add a new resource that has similar attributes to an existing one: locate and select the resource, select Copy, edit as needed, and select Save.
- From the Resources search form, select Add New.
- Select a Resource Category.
Note: The services you selected for the Resource Category will appear in the Services field of this maintenance form. You can add or remove services to this list.
- Enter a Display Name and Shortcut for this resource.
- Services: Select one or more services to associate with this Resource. If any of the services listed here are being booked in the Appointment Editor, Meevo will also attempt to book the associated resource. If the associated resource is not available, the user can select any other available resource, but a resource must be selected to book that service.
- Automatically Reorder: Makes this resource eligible for auto-reordering, which can prevent wear and tear on a resource. Resources are automatically reordered according to what is configured in Business Preferences > Appointment > Resources. You can determine the resource order for each service from the Services > Resource tab.
- Maximum client capacity: The maximum number of clients that can be present in the same room at one time. Setting this value to 0 allows for manual double-booking of this resource. Meevo will never automatically double-book a resource, but you can manually double-book by selecting that resource in the Appointment Editor or moving an appointment in Resource View.
- This resource can be divided into separate resources: Select this option if the resource has a divider/partition that can accommodate multiple clients who are not associated with one another. When this is enabled, each resource "partition" will be its own column in the Appointment Book.
- Configure the Appointment Book Style. The Appointment Book Style color scheme controls color of the client capacity column headers when you are viewing the Appointment Book in Resource View. In the example below, Room 3's Appointment Book Styles are set to black text and green background. There are 3 numbered columns in Resource View because Room 3 has a divider and a maximum client capacity of 3.
Note: Resources inherit their Resource Category's Appointment Book Style. If you change the style in the resource definition, then that resource definition determines how it will appear in the Appointment Book.
- When finished, select Save.
- To confirm that your resource is now added to the configured services, go to that service's maintenance form and view the Resources tab.
Editing a resource
- Locate the resource and select it.
- Select Edit, and make your changes.
- When finished, select Save.
Inactivating or reactivating a resource
When you inactivate a resource:
- Services associated with the resource will remain unchanged.
- Appointments that are already booked in this resource will remain booked in this resource.
- It is no longer selectable from any forms or menus in Meevo.
- It can still appear in Meevo reports.
- It does not appear in Meevo search results unless Inactive is selected from the Advanced menu.
Tip: Remember to select Inactive from the Advanced Search menu to search for inactive items.
- Locate the resource and select it.
- Select Edit.
- Select the switch to toggle it to Active or Inactive.


- Select Save.
Deleting or undeleting a resource
When you delete a resource:
- Services associated with the resource will remain unchanged.
- Appointments that are already booked in this resource will remain booked in this resource.
- It is no longer selectable from any Meevo forms or menus.
- It does not appear in Meevo search results unless Deleted is selected from the Advanced menu.
- It may still appear in Meevo reports depending on the report setup criteria.
To delete or undelete a resource:
- Locate the resource and select it.
- Select Delete or Undelete.
- If deleting, a confirmation message appears. Select Yes to complete the deletion.
- If undeleting, the form becomes active after you select Undelete. Select Save to finish undeleting.