Adding a Client Profile
To get to client profiles, go to Meevo > Data > Clients, or type client into the Convobar.
To add a client profile
- From the client search form, select Add New. You can also copy an existing client profile to quickly duplicate certain information on the profile.
- Across the top of every profile are the client's lifetime Services and Retail sales, along with their # of visits. This is also where the Restricted checkbox can be found (for restricting clients in Meevo).

- Enter the client's full name and, if desired, upload an image of the client.
- Numeric Identifier: A unique number that Meevo automatically generates for each client. In various search fields of Meevo, you can perform a direct client search by entering Qx, with x being this number.
- Third Party ID: Use this field if you need to map clients in Meevo to a third-party system. The Third Party ID field appears on the AQ020 and AQ022 Work Ticket reports and on Receipt Work Tickets. You can also reference this field in Client Searches to look up a client directly; enter an asterisk and then the ID (for example *5198).
- Gender: Depending on how you configure your services, some services may be made available only to a specific gender. For those services, your selection here may impact the service's availability to the client.
- Pronoun: Select the client's preferred pronouns. This field will appear in other areas of Meevo in future releases.
- Client Type: After selecting a Client Type, the badge icon appears. Go here for details about Client Types.
- Referred by: Select the client's referral source.
- There are two Business Preferences options you can enable to require these two fields on new client profiles.
- If client was referred by another Client or an Employee, select the appropriate option and specify the person in the field that appears. If you have Students & Teachers enabled, you can select a Student or Teacher.
- If the client came in on a Referral, select the appropriate Referral Type. Note, a user will be unable to change this field after the client's first transaction unless they have Grant permission to the Edit referral type after transaction has occurred security key under Data > Client > Main > Referred By in Security Administration.
- Multi-locations should note that each client referral is unique to the location; referrals do not follow clients to other locations.
- If the Referred by field is edited, any points that clients received as a result of referral promotions will not change, and clients will not receive points as a result of changing this field if the client's first transaction already occurred.
- Birthday: Enter the client's birthday. There is a Business Preferences option that can make this field required.
- When a complete birthdate is entered, the client's age is displayed next to the Birthday field.

- Meevo also displays a birthday reminder in the Appointment Editor and Register when the client's birthday falls within 15 days before or after the current date.

- When a complete birthdate is entered, the client's age is displayed next to the Birthday field.
- Anniversary: Enter the client's anniversary, if desired. This is for record-keeping purposes; no reminders are displayed for a client's Anniversary.
- Minor: Select for clients who are under the age of 18. This option reveals the Parent/Guardian section, with the required Client field. See About Client Profiles for more information on minors.
- Email: These options determine the client's email notification preferences. See Enabling Client Notifications for guidance on this section.
- Phone: These options determine the client's phone and text notification preferences. See Enabling Client Notifications for guidance on this section.
- Enter the client's Address. This info can be important if displaying the client address in the Appointment Book Smart Assistant (for onsite appts).
- Allow client to book and reschedule appointments via Online Booking: Enable this option to allows this client to book and reschedule appointments online using Online Booking. If this option is disabled and this client attempts to book online, a message appears instructing the client to call the business.
- Allow client to purchase memberships via Online Membership Sales: Enable this option to allows this client to purchase memberships online using Online Membership Sales. If this option is disabled and this client attempts to purchase a membership online, a message appears instructing the client to call the business.
- Transient: Excludes this client from retention and rebooking calculations for this location. Select this option if the client is only visiting the area.
Note: When calculating retention and rebooking, Meevo always looks at the current state of this setting on a client's profile, and then applies it to all of the client's historical data. For example, you could mark a client as transient and run the MA200 for any date range, and the client will be excluded from all retention and rebooking calculations. You could then deselect the Transient setting for that client and run the MA200 for the same date range, and the client would be included in all retention and rebooking calculations. - Allow this client to place charges and credits on account: Enables this client to charge to and place credit on a client account. This option does not need to be enabled to make a payment on a client account balance.
- Limit: If a limit has been set on client account balances via Business Preferences, then a Limit field also appears here on client profiles. The value in this field defaults to what is set in Business Preferences, but you can change it here to set an override for this client only.
- Exclude this client from receiving Points: If enabled, this client will not receive points rewards, regardless of which promotions the business is running.
- Allow this client to make eGift Purchases: Deselect this option to restrict this specific client from making purchases in eGift. eGift-restricted clients cannot make purchases through the eGift site using their login credentials.
- Client does not wish for their personal information to be sold or shared: Enable this option if the client does not wish for their personal info to be sold or shared. This "opt-out" option is available in the client profile and in the client-facing Online Booking and eGift sites when the Client Business Preferences setting Enable clients to opt out of selling or sharing of personal information is enabled.
- External URL: This field is mainly for third-party integrations, where a business needs to link a profile to another site (for example, to cross-reference to the client's profile in a CMS). From the client's Meevo profile, you can select the link to the right of the field to quickly jump to that URL.
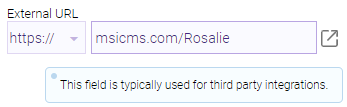
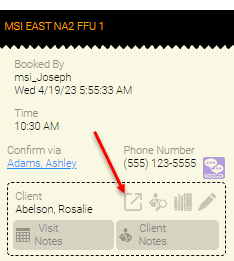
When External URL is filled out, a link is also added to the Appointment Book Smart Assistant when that client is booked...again, for the ability to quickly cross-reference/lookup more information on that client in another system.
- When finished, be sure to select Save.