Enabling Client Notifications
In Notification Settings, you'll select which notifications your business should send and the communication methods for each notification (you can choose to send emails, text messages, or both). Then, within each client profile, you'll enable the notification types for that specific client.
Note: This article guides you through the steps to enable client notifications in Meevo. For more details on the notifications themselves, see About Client Notifications.
Note for multi-locations:
A location's ability to send a notification type depends on the state of the notification type in Central Office (CO). If the option is enabled in CO, then locations will be able to send or not send that notification as desired. But if the option is not enabled in CO, then locations will be unable to send that notification type and if they do enable it, they will see the "disabled at higher level" icon.

Step 1: Enable "Scheduled" and "Immediate" notifications
These notifications can be found in the Client Appointments tab of Notification Settings:
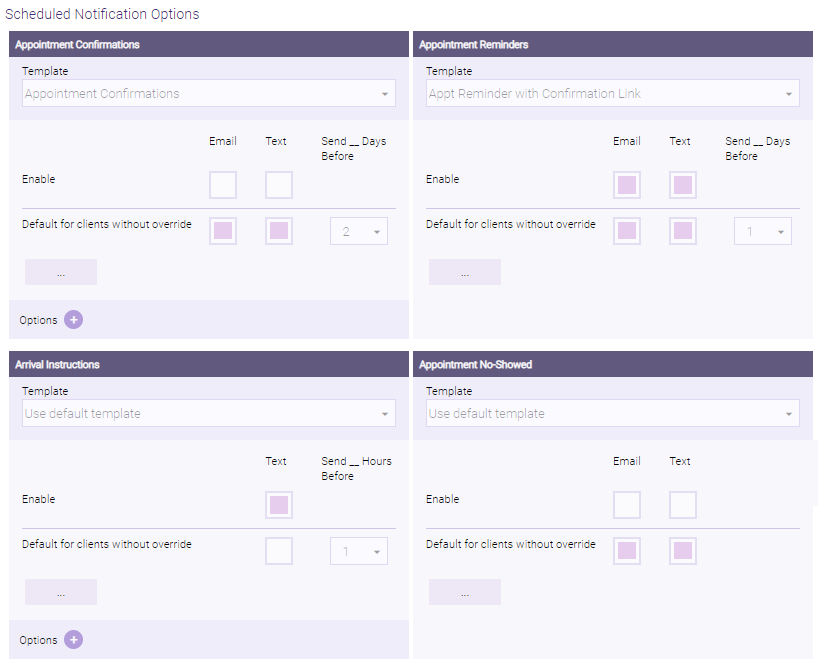
- These options can be found under each notification type:
- Template: This drop-down is where you can select a custom notification template for that notification type. Use default template means that Meevo will use the system's default notification templates.
- Enable Email and Enable Text: Enables the communication method for that notification type.
- Default for clients without override: This determines the option's default state in all client profiles that do not already have the option set to Override. Upon editing and saving, all client profiles that do not have an override will inherit your selections as their default settings. Refer to this topic for supporting details on inheritance and overrides.
- In the Send ___ days/hours before field, configure the number of days or hours prior to the appointment start time that the notification will be sent.
- Bulk update options: These options allow you to perform updates to options across all client profiles at once. Refer to this topic for supporting details on bulk updates.

- Appointment Confirmation Options: Select Options to display additional reschedule and cancellation options. These options apply only to appointment confirmations:
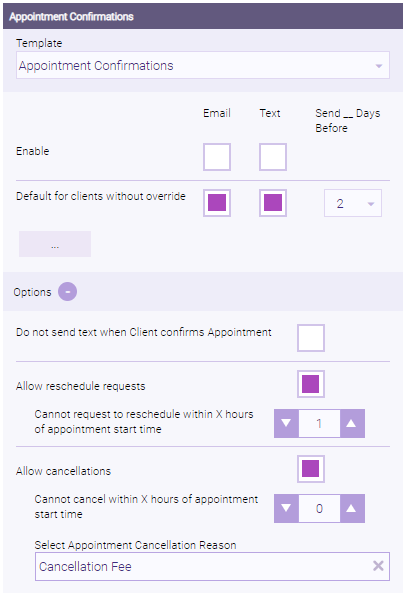
- Do not send text when client confirms appointment: This turns off the system-generated reply that gets sent to a client after they confirm an appointment. Enable this option to reduce your outgoing text message count.
- Allow reschedule requests: Allows clients to request to reschedule their appointment by replying to a confirmation message. Reschedule Request appointments remain on the book until manually removed.
- Cannot request to reschedule within X hours of appointment start time: Limits how long before the appointment start time a client can request to reschedule. Clients who attempt to reschedule within this time frame will receive a notification that the appointment was not rescheduled, and are instructed to call the business.
- Allow cancellations: Allows clients to cancel appointments by replying to a confirmation message. Canceled appointments are automatically removed from the book.
- Cannot cancel within X hours of appointment start time: Limits how long before the appointment start time a client can cancel. Clients who attempt to cancel within this time frame will receive a notification that the appointment was not canceled, and are instructed to call the business.
- Select Appointment Cancellation Reason: Appointments that are canceled as a result of a client response will be assigned the Cancellation Reason selected here.
- When finished, select Save.
Step 2: Enable "Miscellaneous" notifications
These notifications can be found in the Client Miscellaneous tab of Notification Settings:
- Under 5 Star Ratings, Client/Appointment Forms / Membership Forms / Payment Plan Forms (all three are Docs & Forms notifications), Product Purchase Reminder, or Package Sold:
- Template: This drop-down is where you can select a custom notification template for that notification type. Use default template means that Meevo will use the system's default notification templates.
- Enable Email and Enable Text: Enables the communication method for that notification type.
- Default for clients without override (5 Star Ratings and Product Purchase Reminder only): This determines the default state of the option for all client profiles who do not have the option set to Override. Upon saving, all client profiles that do not have an override will inherit these default settings. See the Notifications FAQ for important details on inheritance and overrides.
- In the Send ___ days after checkout field (5 Star Ratings only), configure the number of days after an appointment is checked out/rung up that the ratings message will be sent. A value of 0 means the notification will go out about one hour after checkout on the day of the appointment. The 5 Star Notifications service in Meevo runs at the top of the hour, every hour.
- In the Send thank you for clients who were referred (Referral Thank You only), select a reference point for when referred clients had their first transaction (Yesterday, Last Week, Last Month).
- Bulk update options (5 Star Ratings only): See More on Notification Overrides and Bulk Updates for details on performing bulk updates to client notifications.
- Under Self-Pay and Wait List, only the notification template can be changed. Use default template means that Meevo will use the system's default notification templates.
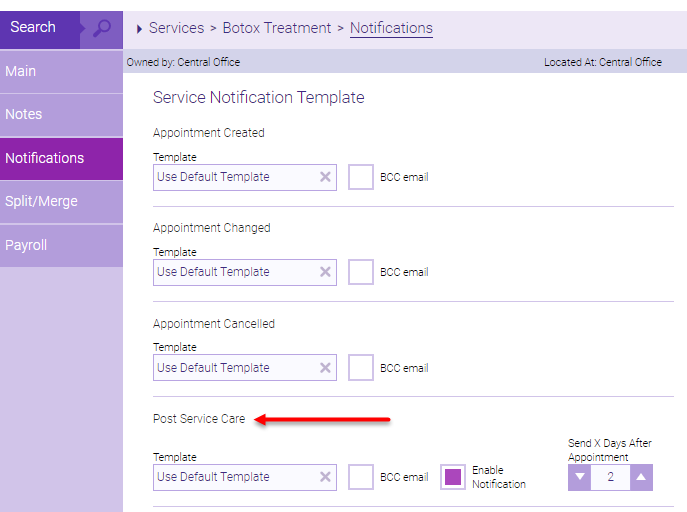
- Under Post Service Care, select a default template if needed and enable the communication methods you wish to use. Then, on each service definition that requires it, enable the "Post Service Care" notification via the Notifications tab. There, you can select individual, service-specific custom templates that you've created. The Send X Days After Appointment option is also configured on a per-service basis, allowing you to customize the timing of the follow-up notification based on the service.
Step 3: Enable notifications for individual clients
Client notification options reside within each client profile. There, you can manage whether that client receives:
- Appointment notification emails
- Marketing emails
- Appointment notification texts (via the "opt-in" option)
- Marketing texts
- Appointment confirmations via phone
Enabling email notifications for a client
To send email notifications to a client, you'll need to specify which clients should receive them.
Note: Clients do not receive an opt-in email, as they are not required to opt-into email notifications.
- Locate and select the client profile.
- In the Email section of the Main tab:
- Email Address: This email address is used for notifications, so it must be unique. Entering a valid email address enables the options below it.
- Use for appointment notifications: Select to use this address for email notifications and to make this client eligible to appear in the Client Selection Export. This option must be enabled for the client to receive email appointment notifications.
- Use email for marketing: Select this option to make this client eligible to appear in the Client Selection Export list and in Email Marketing campaigns. A valid Email Address must be entered above in order to select this option. Note that clients can enable and disable this option through their Online Booking profile.
- Opted-in for Emma Email Marketing: This is a read-only checkbox that automatically appears in the client's profile if the client is eligible for Email Marketing syncs. The Email Marketing integration must be enabled for this checkbox to appear.
- Undeliverable and Flagged as spam: Meevo will automatically enable one of these if the client's email is deemed undeliverable or if the client marks an email notification as spam. If either checkbox is enabled, Meevo will not send notifications to this client's email address. You can manually uncheck these statuses and save the profile to resume sending notifications to this client. This FAQ lays out the conditions that make these checkboxes turn "enabled."
- Next, select the Notifications tab and enable Send Email beside your desired notifications:
- Send __ Days Before: Specify the number of days prior to the appointment date and time that the notification will be sent.
- Default/Override: Set this switch to Default to inherit the default settings (as defined in Notification Settings). To override the default setting, toggle the switch to Override and make your selection. See More on Notification Overrides and Bulk Updates supporting details on overrides.
- When finished, select Save. Your changes take effect immediately.
Opting a client into appointment and/or marketing text notifications
- Locate and select the client profile.
- Select the Main tab and select Edit.
- In the Phone section of the Main tab:
- Ensure that a valid Mobile phone number is entered. There will always be at least one row for each phone type. For example, if you add two Mobile numbers (by changing the Type from Home to Mobile), Meevo will automatically create another row that defaults to Home.
- Select Primary to indicate that this is the main phone number for this client. The Primary phone number will appear in reports and the Confirmation Manager for this client.
- Select Opt-in for text notifications to immediately send the client an opt-in text message after you save the profile. Clients can opt-into text notifications by replying directly to the opt-in text message, and you can check the Opt-in status in a client's profile at any time for real-time updates.
After you enter a mobile number, your configured default Opt-in status is applied. Be sure to check or uncheck this option afterward if changes are needed. - The Send Text icon is available if the client is opted-in for text messages. Select this option to open Client Find on this client's Send Txt Msg tab, where you can send this client a one-way message. If you are using the Textel integration, selecting Send Text Msg brings you right to Meevo Messenger.

- Select Use for text marketing if the number is also to be used for text marketing. This option serves two purposes: it determines the state of the Promotional SMS field in Emma when a client is synced via the Email Marketing integration, and it acts a flag for the Only include clients opted in for text marketing filter option in the Client Selection Export.
- Next, select the Notifications tab and enable Send Text beside each of your desired notifications.
- Send __ Days Before: Specify the number of days prior to the appointment date and time that the notification will be sent.
- Default/Override: Set this switch to Default to inherit the default settings (as defined in Notification Settings). To override the default setting, toggle the switch to Override and make your selection. See More on Notification Overrides and Bulk Updates supporting details on overrides.
- When finished, select Save. Your changes take effect immediately.
Opting a client into phone confirmations
When you enable phone confirmations for a client, you are enabling the "Phone" notification type in the Confirmation Manager. The phone icon will light up for this client in Confirmation Manager, indicating that the client should be called to confirm an appointment.
- Locate and select the client profile.
- In the Phone section of the Main tab:
- Ensure a valid phone number is entered.
- Select Primary beside the phone number to receive phone confirmations. Only the primary number can receive phone confirmations.
- Select Use for phone confirmation to enable the visual indicator in the Confirmation Manager, which informs the user that you should call that client. If your business doesn't make confirmation phone calls, you can hide this checkbox via a Business Preference option.
- When finished, select Save. Your changes take effect immediately.
Other Optional Notification Tasks
Redirecting a client's notifications to another client
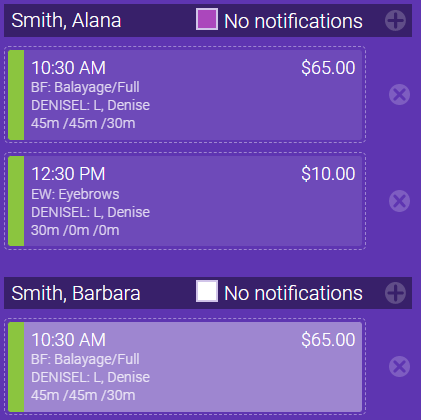
Select a client in the Send appointment notifications to option to designate that person to receive all notifications for this client. Meevo will use the selected client's notification settings (Barbara in the image below), so the settings on this profile are hidden. Also, the Appointment Book Smart Assistant will display the Send appointment notifications to client's contact information, not the booked client's info.

Note: Another way to reroute a client's notifications is by selecting the Minor checkbox on the client's profile and selecting a Parent/Guardian to receive notifications.
Turning off a client's appointment confirmations (Do Not Confirm)
Select Do not confirm to disable text and email confirmations for all current and future appointments for this client. Reminders can still be configured and sent. Note regardless of this option's state, an appointment's status will always take precedence over this option for that appointment only.
If this option is enabled and you disable (deselect) it, all current and future appointments will be set to Unconfirmed, and confirmations will be sent according to the client's notifications settings.

Turning off all notifications for a client's specific appointment
If you wish to hide a service or appointment from the servicing client (for a surprise appointment for example), enable No notifications in the Appointment Editor.
When No notifications is enabled:
- All client-related appointment notifications (Confirmations and Reminders, Docs & Forms notifications, 5-Star Ratings notifications, and Arrivals) are turned off for this client for this appointment only.
- If the servicing client is also the Paying Client, then all notifications are disabled for all clients on the appointment.
- The appointment does not appear on the Future Appointments area of the client's receipt.
- Confirmations for this appointment cannot be manually sent to the client through Confirmation Manager.
Setting default notification options in client profiles
In the Communication Methods section of Notification Settings > Main, you can set the default values for opt-in options; your changes will affect client profiles that don't have overrides.
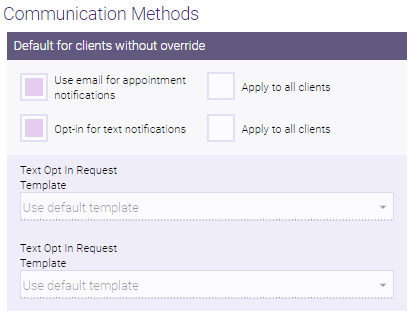
- Use email for appointment notifications: If this option is enabled when a valid email address is entered into a client profile, the profile's Use for appointment notifications checkbox is automatically selected.
- Opt-in for text notifications: If this option is enabled when a valid mobile phone number is entered into a client profile, the profile's Opt-in for text notifications checkbox is automatically selected.
- Apply to all clients: This applies, via a bulk update, the setting's value to all client profiles that don't have an override. See More on Notification Overrides and Bulk Updates for details on performing bulk updates to client notifications.
- Text Opt In Request Template: Use this drop-down to select a custom notification template for text opt-in messages.
- Text Opt In Request Confirmation Template: Use this drop-down to select a custom notification template for opt-in confirmation messages that go to clients.
- When finished, select Save.