Using Client Find
Client Quick Find is a fast way to look up client profiles, perform actions on appointments, edit the client's appointment, and modify appointment status. If you know the client's name, use Client Quick Find to quickly perform these actions.
- Select Client Search in the upper-right corner of Meevo to reveal the Find window.

- Enter any of the following criteria into the Search field. See Searching for Client Profiles for details on all of the different ways you can search for clients.
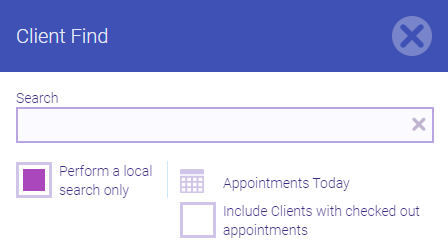
- To refine the search:
- Select Perform a local search only to only search for clients within your location. If a local search returns no results, a global search occurs automatically. Clients who have records in other locations have a globe beside their name.
- Select Appointments Today to view a list of today's clients who have appointments but who are not yet checked out. To include clients who have checked out today, select Include Clients with checked out appointments.

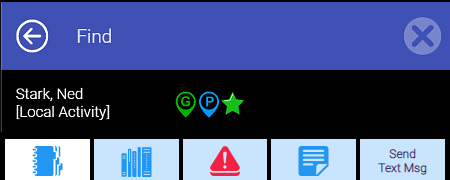
- Select a client from the list to display the action tabs.
- The client name and other details appear above the action tabs. Icons appear to the right of the client name; select any of those icons to open the relevant screen. For example, select a membership icon to open Membership Manager, or the package icon to open the Packages tab of the client's profile.
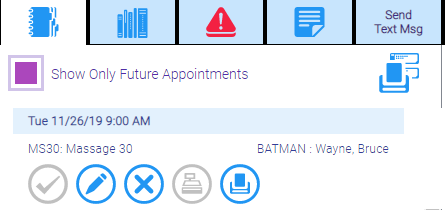
The Appointments tab
The Appointments tab lists the client's appointments.
Show Only Future Appointments displays today's appointments and future appointments, not including future cancelled appointments. Deselect this option to display appointments from the past and future cancelled appointments.
Icons, from left to right: Check-in, Edit, Delete, Checkout, Print Ticket
Select the printer icon to open the AQ025 report (Appointments for Specific Clients) with fields pre-populated based on the selected client.
The History tab
The History tab displays the client's previous 10 transactions.

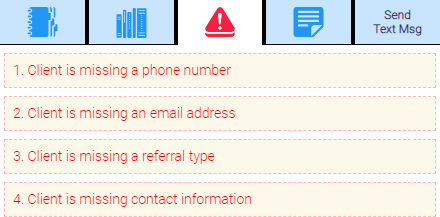
The Alerts tab
The Alerts tab notifies you of missing client profile information.
To resolve alerts
- Select Alerts.
- Select an alert to open the corresponding form, where you can take action to resolve the alert.
- Do this for all of the alerts in the list. When there are no more alerts for the client, the Alerts row disappears from the Quick Find menu.
The Visit Notes tab
Select Visit Notes  to jump directly to the Visit Notes tab of the client's profile.
The Send Txt Msg tab

- Send one-way text messages to opted-in clients from the Send Txt Msg tab.
- Meevo will automatically insert your business name into the message in case the sender forgets to ID themselves.
- Messages sent from this tab count towards your monthly Meevo text message allotment.
- If you are using the Textel integration, selecting the Send Text Msg tab brings you right to Meevo Messenger. In that case, text messages count towards your Textel allotment and are two-way (since they are in Meevo Messenger).
Note: Text notifications must be enabled in Notification Settings for the Send Text Msg tab to appear in Client Find. If you enable text notifications while Meevo is in use during the day, all logged-in users must log out and then log back in to see the tab.