Booking a Standing Appointment
What is a Standing Appointment?
A Standing Appointment is a collection of service appointments that repeat in the future. You can book standing appointments up to two years (24 months) in advance.
Are there options that affect Standing Appointments?
In Business Settings > Preferences, the Perpetual Standings section contains options that affect Standing Appointments. Be sure to check those settings if your Standing Appointments are not booking as you'd expect.
How do notifications work with Standing Appointments?
Standard Confirmations, Reminders, and Arrival notifications are sent according to the normal client or business settings. To avoid spamming the client with too many notifications, immediate "Appointment Booked" notifications are not sent for the initial creation of Standing Appointments. With Standing Appointments, immediate Appointment Booked notifications are sent only if a conflict appointment is manually booked through the Manage Appointments tab.
To book a Standing Appointment
Tip: To quickly book a new appointment that will have similar details to an existing one, first locate and select the existing Standing Appointment. Select Copy. Complete the required fields, and select Save when finished.
- To get to Standing Appointments, go to Meevo > Appointments > Standing Appointments, select Standing Appointments from the Appointment Book's menu, or type stand into the Convobar.
- Select Add New.
- Client: This is the client who is being booked for a standing appointment.
- Service and Employee: Enter at least one service and employee for this standing appointment. You can repeat these sub-steps for as many services as required.
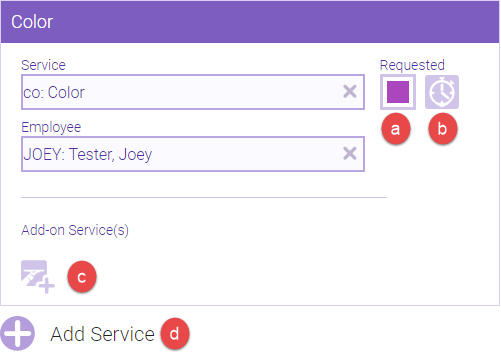
- Select Requested if the employee was specifically requested for this service. The option is specific to the service and employee, not to the entire standing record, so you can have several services in a standing appointment...some requested, some not.
- Servicing and Gap: You can edit these step timings, if needed.
- Add-on Services: If you enter a service that has add-ons mapped to it, the add-on icon appears, where you can also book the associated add-on(s).
- Select Add Service and define the same or a different service/employee combination.
- Appointment Category: If you select an Appointment Category, the category applies to all services in the appointment. This can be edited at any time.
- Define the frequency of the appointment (how often it Occurs):
- Daily: Specify the frequency in Every __ days.
- Weekly: Select the day(s) of the week and specify the frequency in Every __ weeks.
- Monthly: Specify the frequency in Every __ months. If you select Day of week, select the Occurrence in Interval. If you select Day of Month, enter the Day of Month on which this appointment will recur.
- Force book appointments when an employee is not scheduled for a bookable work activity: If enabled, the employee will be booked even if not scheduled at all, or if scheduled but the appointment would be during off time, or if scheduled but not for a bookable Work Activity.
- Do Not Confirm: This marks the client's standing appointments as Do Not Confirm, but it does not affect the notification status of any of the client's other appointments (for example, appointments booked via Online Booking or in the Appointment Book). This allows clients to receive notifications for regular appointments, but not for their standings.
- If the client has Do Not Confirm enabled on their profile, it will be enabled automatically in the standing definition when the client is added.
- Enabling or disabling the Do Not Confirm option on the standing definition does not impact the option on the client profile. You can edit this option in the standing definition at any time without impact to the profile.
- Enabling or disabling the Do Not Confirm option in an existing client profile will also update the option in the client’s standing definitions.
- Select the Start Date and Start Time for the recurring appointment. Select Define start times manually to manually set the start times for each services; use this option if you need the services to start at the same time.
- Define when the Appointment Ends:
- Never (Perpetual): There is no end date to the recurring appointments. Be sure to check out the Perpetual Standings section for details on options that affect perpetual standing appointments.
- After number of appointments: The standing appointment ends after this many instances. For example, if an appointment occurs Weekly, Every 1 weeks, on Mon, Wed, and Fri, and the value in this setting is 4, Meevo will book 12 standing appointments: 4 instances of 3 appointments per week.
- By date: Occurs as often as configured, but ends on the date entered here.
- When finished, select Save. The Standing Appointments are added to the Appointment Book where possible. Go to the Manage Appointments tab to review appointments that were not booked or to edit appointments that were booked.
To manage Standing Appointments
The Manage Appointments tab shows which standing appointments were booked and which were not due to conflict. Appointments with conflicts can be booked using the tools on the screen. Appointments that were booked can be edited from this screen as well.
- Select the Manage Appointments tab. A list of all of the client's standing appointments appears.
- If necessary, use the Show filter to refine which appointments display in the list.
Managing Booked appointments
- Locate the booked appointment, and make changes to the appointment as needed.

- Select Delete to delete this appointment from the series.
- Select Edit to open this individual appointment in the Appointment Book's Appointment Editor, where you can edit it as needed.
- Select Scan selected employee to open a list of available openings for the currently booked employee. Results are within the next 7 days from the scheduled appointment. You can Show more results for the displayed day, or display this employee's openings over the Next 7 Days. If you select Book beside an opening, that booking will take the place of the one being rescheduled.
- Select Scan any employee to open a list of available employees. Results are within the next 7 days from the scheduled appointment. You can Show more results for the displayed day, or display this more openings over the Next 7 Days. If you select Book beside an opening, that booking will take the place of the one being rescheduled.
- When finished, you can navigate away or continue on to deal with Conflict appointments (described below).
Managing Conflict appointments
- Locate the conflict appointment, and make changes to the appointment as needed.

- Select Delete to delete this appointment from the series.
- Select Override conflicts to book this appointment, regardless of any conflicts.
- Select Scan selected employee to open a list of available openings for the currently booked employee. Results are within the next 7 days from the scheduled appointment. You can Show more results for the displayed day, or display this employee's openings over the Next 7 Days. If you select Book beside an opening, that booking will take the place of the one being rescheduled.
- Select Scan any employee to open a list of available employees. Results are within the next 7 days from the scheduled appointment. You can Show more results for the displayed day, or display this more openings over the Next 7 Days. If you select Book beside an opening, that booking will take the place of the one being rescheduled.
- When finished, you can navigate away or continue on to deal with Conflict appointments.