Viewing a Client's History
Client History provides an enormous amount of historical information related to the client: visit history, account activity, gift card history, package usage, transaction and discount history, and more.
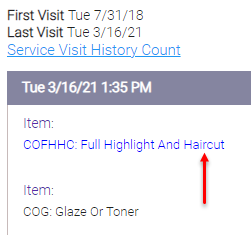
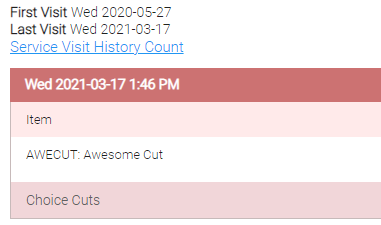
Note: At the top of the History screen are the first visit date and the date of the most recent visit for this client.
To view number of visits
Select the History tab, and then select Service Visit History Count below the filters drop-down.
This displays the total number of the client's service transactions. .

To view account activity
Account activity refers to charges, payments, and credits on a client's account (including deposits).
- Select the History tab, and then select Account Activity from the drop-down menu.
- Use the filters at the top of the screen to narrow down the search date and time range.
- Select All to view all Item Types, or select a specific one: Account Charge, Payment, Credit, Deposit Payment, or Deposit Charge.
- Select Apply to view details.
- In the results, selecting the transaction number launches the Transaction Editor.
To view appointment history
Note: From this History tab, you can also view the audit history of individual appointments. See Viewing Appointment Audit History for details.
- Select the History tab, and then select Appointment History from the drop-down menu.
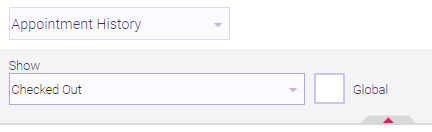
- From the next drop-down, select the appointment state you wish you filter by.
- If desired, you can select Global and then Apply to view transaction details for this client at other locations. To use the Global filter, a user's Security Role must have Grant access to the Global Filter key under Data > Clients > History.
- Otherwise, only transactions from the current location are displayed.
- In the results, you can select the Transaction # to open Transaction Editor.
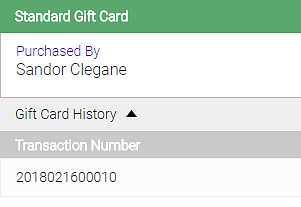
To view gift card history
- There are several ways to locate gift card information:
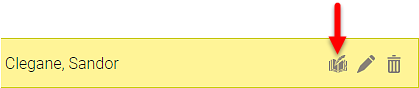
- Clients with an active or expired gift card have a "G" indicator appear by their name in the register, Appointment Book, and in Client Find. Select this icon to open the Client > History screen.

- Locate and select the client profile, select the History tab, and select Gift Card History from the drop-down menu.
- If you know the gift card number, use the Gift Card Lookup to locate the gift card.
- Clients with an active or expired gift card have a "G" indicator appear by their name in the register, Appointment Book, and in Client Find. Select this icon to open the Client > History screen.
- If needed, you can use the filter to refine the list by gift card status.
- The rows display all information relevant to the gift card, including the original and remaining balance. You can select the encrypted gift card number to automatically open the Gift Card Lookup modal.
- Gift cards that have balance remaining appear with a green header. Select Gift Card History to reveal details for that transaction. Selecting the transaction number takes you to the Transaction Editor for that specific purchase or redemption.
- Expired gift cards that have remaining balance appear with a red header and Expired text, and an alert symbol beside the Remaining Balance field.

- Gift cards that have balance remaining appear with a green header. Select Gift Card History to reveal details for that transaction. Selecting the transaction number takes you to the Transaction Editor for that specific purchase or redemption.
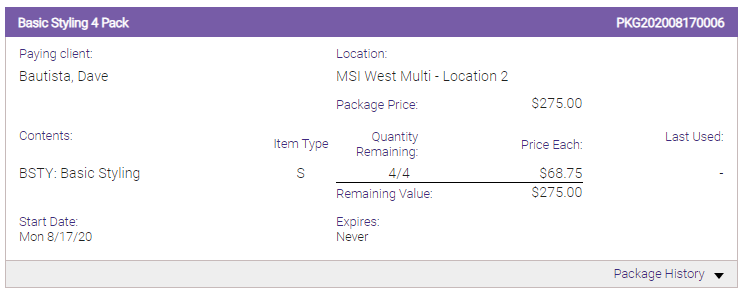
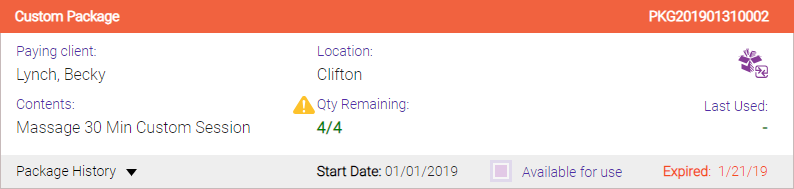
To view package history
In Package History, Meevo uses abbreviations that indicate how a package was created. Regular packages have a prefix of PKG. Packages created as a result of a split have a PKSPL prefix. Packages created as a result of a merge have a PKMRG prefix.
- In the client's profile, select the History tab.
- Select Package History from the drop-down.
- If needed, you can use the filters across the top of the screen to refine the list.
- In the results, the rows display all information relevant to the package, including the package Start Date, which indicates when the package will be available for the client to use, the package expiration date, and the package contents, price each, and total price.
- Active packages appear without any red text. Select Package History to reveal the redemption history for this package. Selecting the transaction number takes you to the Transaction Editor for that specific redemption.
- Expired packages that have remaining items appear with a red package name and number, and an alert symbol beside the Qty Remaining field.
- Active packages appear without any red text. Select Package History to reveal the redemption history for this package. Selecting the transaction number takes you to the Transaction Editor for that specific redemption.
Note: Expired packages can be "unexpired" (made available for use). See Making an Expired Package Available for Use for details.
To view transaction history and discount history
- Jump to a client's History tab using any of the following methods:
- Locate and select the client profile, and select the History tab.
- Select Transaction History from the Appointment Editor.

- Select Transaction History from the register's Smart Receipt.
- From the History tab, with Transaction History selected in the drop-down, toggle between Transaction View and Discount View to see those transactions. Use the Item Type filter across the top of the screen to refine the list.

- Rebooked services that were checked out will appear in blue text.
- Transactions that included at least one refund item will appear with a red header.
- Rebooked services that were checked out will appear in blue text.
- From the filter drop-down, you can select an Item Type to narrow down the list of results. Results will be filtered to include any transaction that included the selected item type. For example, select Memberships to view any transaction that included a membership.
- The Service Only and Product Only item types display only those items that were on any transaction, regardless of what else was on the transaction. Using Product Only as an example, a transaction that included a product and a package would display only the product in the results.
- Select the All Item Type to include tip-only transactions.
- You can perform the following actions on a transaction: print or email the receipt, issue a refund, select LOG to open this transaction in Activity Log, and select the transaction number to open it in Transaction Editor.