Finalizing a Sale and Accepting Payment
- When ready to finalize a sale, select Pay Now. The Balance Due screen appears.
- At the top of this screen is the Prompt for Tip on Credit Card Device checkbox, which allows you (the Meevo user) to choose whether the credit card reader should include the tip workflow. In cases where a client wishes to pay for a service by credit card but wants to tip in cash, you would not enable this option. The option appears as long as all of the following are true:
- The selected Merchant Account has tips enabled.
- There is at least one tip-eligible service on the transaction and an employee who can receive tips.
- You are using a credit card device (terminal) and not the Hosted Page.
- Select the payment type:
Credit/Debit (Single Card) Credit/Debit (Single Card) (available when credit card processing is Enabled)
- Select Credit/Debit (Single Card). This is a single payment method that will satisfy the entire balance.
- Prompt for manual entry of credit card information on the device (not available for MeevoPay): This option, when enabled, prompts the client to manually enter the card information, rather than insert chip or swipe. Enable this option if the client's card or your device is damaged, and swiping or inserting the card is not registering on the device.
- Billing zip code: This is an optional field where you can enter the billing zip code for the client. This field is especially useful if the client is using a foreign (out of country) credit card, as you can enter that zip code here if the device will not accept it.
- If tips are enabled for the Merchant Account and a tip has not already been added to the Smart Receipt, then Meevo sends a tip request to the credit card device. This occurs as long as there is at least one tip-eligible service on the transaction or a tip was not already canceled or cleared. The client should then follow the instructions on the device to specify a tip amount, if any.
- The client follows the instructions on the device, inserting/swiping the card and verifying the amount. The payment is processed and the client can remove their card when the device prompts them to.
- Meevo prompts you for tip allocation. Allocate tip if necessary and select OK when ready.
- Choose a receipt delivery option, if desired. This is the final step of the transaction.
Credit/Debit (Multi-Card) Credit/Debit (Multi-Card) (available when credit card processing is Enabled)
- Select Credit/Debit (Multi-Card).
- If tips are enabled for the Merchant Account and a tip has not already been added to the Smart Receipt, then Meevo sends a tip request to the credit card device. This occurs as long as there is at least one tip-eligible service on the transaction or a tip was not already canceled or cleared. The client should then follow the instructions on the card processing device to specify a tip amount, if any.
- Meevo prompts you for tip allocation. When ready, select OK.
- After allocating the tip, select the payment amount:
- To make the payment in full, select Process. This amount includes the tip, if any.
- To make a partial payment, select Other Amount, enter the amount, and select Add Payment.
- Prompt for manual entry of credit card information on the device (not available for MeevoPay): This option, when enabled, prompts the client to manually enter the card information, rather than insert chip or swipe. Enable this option if the client's card or your device is damaged, and swiping or inserting the card is not registering on the device.
- Billing zip code: This is an optional field where you can enter the billing zip code for the client. This field is especially useful if the client is using a foreign (out of country) credit card, as you can enter that zip code here if the device will not accept it.
- The client follows the instructions on the device to swipe the card and verify the amount. After the payment is processed, the Smart Receipt is automatically updated to display the type of card was processed, the last 4 digits of the card, and the amount.
- If making partial payments, use any of the payment methods described in this topic to satisfy the balance due.
- When a payment satisfies the balance due, the Change Due window automatically appears.
- Choose a receipt delivery option, if desired. This is the final step of the transaction.
Credit/DebitCredit/Debit (available when credit card processing is Not Enabled)
- Select Credit/Debit.
- Select the payment amount:
- To make the payment in full, select Process.
- To make a partial payment, select Other Amount, enter the amount, and select Add Payment.
- Select the payment type from the list of tiles.
- If making partial payments, you are brought back to the register after selecting a tile. Use any of the payment methods described in this topic to satisfy the balance due.
- When a payment satisfies the balance due, the Change Due window automatically appears.
Card on FileCard on File (available when credit card processing is Enabled)
Note: Clients with a card on file appear with a card on file icon ![]() in the Smart Receipt. You can select this icon to open the Client > Credit Card screen.
in the Smart Receipt. You can select this icon to open the Client > Credit Card screen.
Note: Paying with a card on file will always satisfy the balance due. You cannot specify an amount when paying with a card on file.
- If there is at least one available card on file, the tile appears with a green "check." Cards on file for the Paying Client and servicing client (if different from the Paying Client) will appear here.
- Select the Card on File payment type to view available cards. You can also search for other cards on file from the Client search and select one of those cards to use for this purchase.
- Meevo differentiates between a client profile card on a file (left image) and a membership card on file (right image):

- Select the desired card and select Add Payment.
- The next step is to add tip if one hasn't been added yet. This will either appear on-screen or will be sent to the device, depending on the Drawer's tip handling workflow options. Enter a tip and select Next.
- The client should either sign on-screen or on the device. Again, this depends on the signature handling workflow options configured in the Drawer's definition.
- After the payment is processed, the Smart Receipt is automatically updated to display the type of card was processed, the last 4 digits of the card, and the amount.
- The Change Due window automatically appears.
- Select Cash.
- Enter an amount using the on-screen keypad.
- Select Add Payment. The payment and payment type appear under Applied Payments in the Smart Receipt.
- If making partial payments, use any of the payment methods described in this topic to satisfy the balance due.
- When a payment satisfies the balance due, the Change Due window automatically appears.
See Setting Up Payment Plans for details on using this Payment Type.
Points/Rewards RedemptionPoints/Rewards Redemption
Note: Points redemption cannot exceed the balance due.
- If the paying client has points on file, the Points Redemption tile appears with a yellow check. Select the tile.
- Enter the Value to Use. The amount available depends on your business points-to-value ratio. Alternatively, select Auto-redeem to apply the entire available Point Value.
- Select Add Payment. The payment appears under Applied Payments in the Smart Receipt.
- If making partial payments, use any of the payment methods described in this topic to satisfy the balance due.
- When a payment satisfies the balance due, the Change Due window automatically appears.
Note: Clients with an active or expired gift card have a "G" indicator ![]() appear by their name in the register, Appointment Book, and in Client Find. You can select this icon to open the Client > Gift Card History screen.
appear by their name in the register, Appointment Book, and in Client Find. You can select this icon to open the Client > Gift Card History screen.
- Select Gift Card. If the paying client has a gift card with a balance on file, the Gift Card tile appears with a green check.

- If the client has a gift card with a balance, the client and gift card information are already added. If the client has multiple gift cards, you can select the gift card from the Gift Card # - Gift Card Type - Balance drop-down. The Redeem amount defaults to the balance due, and can be edited.
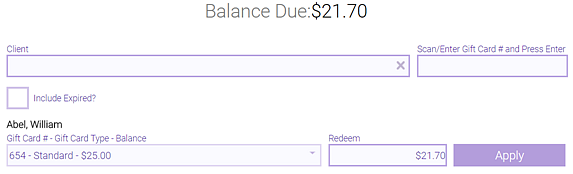
Note: Select Include Expired? to display expired gift cards as well. This option may not appear, depending on your security.
- Select Apply. The payment and payment type appear under Applied Payments in the Smart Receipt.
- Multiple gift cards can be used in a single transaction, even gift cards that do not belong to the Paying Client. To locate another client's gift card, select the Client who owns the gift card or Scan/Enter Gift Card #. The client's name appears in the list. Edit the Redeem amount and select Apply.
- If making partial payments, use any of the payment methods described in this topic to satisfy the balance due.
- When a payment satisfies the balance due, the Change Due window automatically appears.
Note: To charge to a client's account, make sure Allow this client to place charges and credits on account is enabled in the client's profile.
- If the paying client has account credits available, the Account Charge tile appears with a green check. Select the tile.
- Specify the Account to be charged and use the keypad to enter the amount.
- Use the keypad to enter the amount to charge.
- Select Add Payment.
- When a payment satisfies the balance due, the Change Due window automatically appears.
- Select Check.
- Enter the Check Number.
- Enter an amount using the on-screen keypad.
- Select Add Payment. The payment and payment type appear under Applied Payments in the Smart Receipt.
- If making partial payments, use any of the payment methods described in this topic to satisfy the balance due.
- When a payment satisfies the balance due, the Change Due window automatically appears.
This payment tile appears if you are using the CareCredit integration. See this topic for details on ringing up a CareCredit transaction.
- Select Other to display a list of Payment Types tiles.
- Select the payment type.
- Enter an amount using the on-screen keypad.
- Select Add Payment. The payment and payment type appear under Applied Payments in the Smart Receipt.
- If making partial payments, use any of the payment methods described in this topic to satisfy the balance due.
- When a payment satisfies the balance due, the Change Due window automatically appears.
For important details related to this payment type, be sure to review the About Self-Pay topic in its entirety before proceeding with the steps below.
- Select Self-Pay. You are taken to the Balance Due screen.
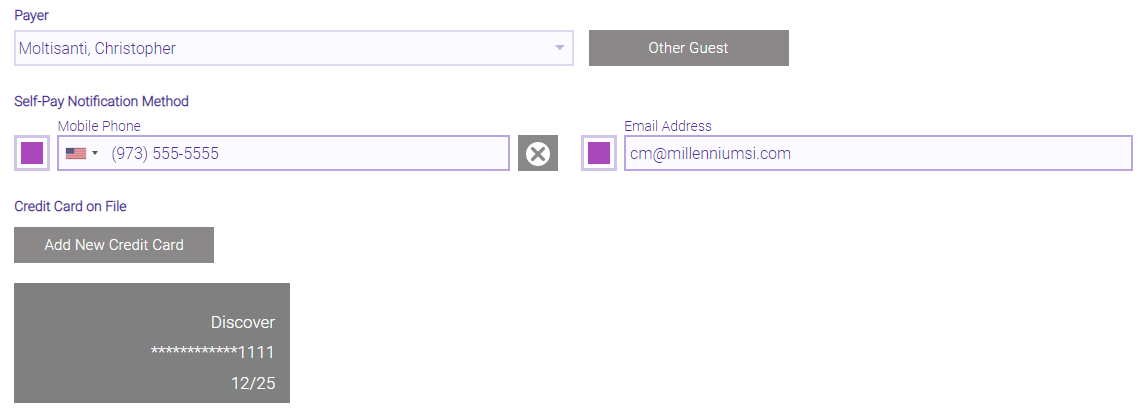
- Payer: This defaults to the Paying Client. If the paying client is different from who is listed here, you can select from the drop-down any of the clients who are on the transaction, or select Other Guest to select another profile.
- Self-Pay Notification Method: Select which notification methods to send to the client. You can use one or both methods. The Mobile Phone and Email Address default to what is in the client profile, but both can be edited here in the register for the purpose of Self-Pay. Changing a client's number or email here does not change it in the profile.
- Credit Card on File: This section displays whether a client already has a card on file. As a matter of good practice, we recommend ensuring that clients using Self-Pay also have a card on file. Select Add New Credit Card to add a credit card on file for this client.
- Select Send Self-Pay. A message appears informing you that the notification was sent, and the transaction is now on-hold in Return Transactions.
Note: You can remove an applied payment from the Smart Receipt at any time by selecting delete  beside the payment. Some payment Amounts can be edited as well.
- In the Change Due window, select Finalize Sale to complete the sale. Alternatively, select Add Tip to open the tip window, or Back to Sale to be taken back to the register and Smart Receipt.
Note: You can execute a tip-only transaction by selecting the Add Payment button, which appears when the balance due is zero (either due to payments satisfying the balance due or due to items on the Smart Receipt that have no price).

- After the transaction is finalized, a window appears with options for delivering the receipt to the client.
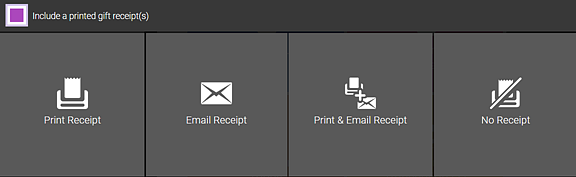
- Select how to provide the receipt:
- Print Receipt: Prints the receipt to the assigned receipt printer.
- Email Receipt: Displays a window where you can enter the client's email address. If there is an email address in the client's profile, it appears in the field automatically, and you can edit it if needed. If there is no email address on file for the client, Meevo will update the client's profile with the email you enter here. The profile will not be updated if it already has an email address, if the entered email address already exists elsewhere in Meevo, or if there are multiple clients on the Smart Receipt. Note that to email receipts, the Email Service must be turned on in Meevo.
- Print & Email Receipt: Prints and emails the receipt to the client.
- No Receipt: Closes the window and finalizes the transaction with no further action.
To apply change due as a tip
If a customer is owed change after a transaction, the change due can easily be applied as a tip to the employee:
- The Change Due window appears after you add enough payment to satisfy the balance due. In this window, select Add Tip.
- Enter the tip amount in any of the following fields.
- Apply X%: This percentage is applied to every employee in the list.
- Tip Amount or Tip Percentage: Specify the value in the respective employee's row.
- Select Add Tip to apply the tip amount to the Smart Receipt. The Change Due window appears with a balance of zero (0).
- Select Finalize Sale.