Adding or Editing a Product
To get to Products, type product into the Convobar, or go to Meevo > Data > Products.
To add a product
Tip: If creating several records that have similar details, select Copy to create a new record with fields identical to the one you just copied. This can save you a lot of time when creating data in Meevo.
- From the Products search form, select Add New.
- Enter a Display Name and optional Description for the product.
- Product Category: Select a Product Category for this product.
- Short Description: Short Descriptions appear when you select the "i" icon in Meevo's Appointment Editor or Register.
- You can generate descriptions using AI! Click Generate above the Short Description field to instantly create professional, client-friendly content. Choose your tone (Creative, Balanced, or Business), pick from multiple suggestions, make edits as needed, and save.
- AI-generated content may include inaccuracies or outdated information. We highly recommend giving it a quick review to make sure everything looks good!
- Manufacturer: Select the manufacturer of the product.
- Distributor: Select one or more distributors who offer this product. When a product is associated with a distributor, you can search for the product by the Distributor ID (a field that is explained further below), as well as create Purchase Orders containing only products associated with that distributor.
- Non-Taxable: If selected, this product does not incur a tax at the register. Hides Tax Applied.
- Tax Applied: Select a tax rate for this product. The available options are configured in Currency and Tax.
- Configure the Product Details:
- Does this product come in various colors, sizes, etc.? If the product is available in various colors, sizes, or other attributes, toggle the switch to Yes and continue to step b below.
Important: If you plan on enabling this option later, see To edit a product for details.
- Select Add Attribute Field and select an Attribute from the drop-down. The Variants box to the right of the field appears. Enter the values for this attribute, pressing Enter on the keyboard or keypad after each entry. To add additional attributes, select Add Attribute Field and repeat this step. Each product can have up to three attributes. After you save, the attributes cannot be removed, but you can add attributes (up to a maximum of 3), rename attributes, and add new attribute types.
Important: Variants can be deleted during the initial creation of the product (for example, if you do not carry a particular variant). You can Recover Deleted Variants from the drop-down as long as you haven't saved yet. After saving a product that has variants, those saved variants cannot be deleted.
- SKU/Code: A product's SKU is a unique alphanumeric code used internally, usually by an inventory manager, to track inventory and differentiate products from one another. SKU codes usually include some characteristics of a product, i.e. size, color, etc. For example, if MSI produced a 12 oz bottle of red hair coloring, the SKU could be msidye12r...the manufacturer (MSI), followed by the product type (dye), size (12), and color (red). Note that in reports and on-screen, Meevo orders products alphabetically by SKU, so you should have a consistent "format" for SKUs to make it easy to locate products in Meevo.
- Barcode: A barcode is a number sequence that gets rendered as a series of thick and thin lines that a scanner can read. Unlike SKUs, barcodes are universal in that a product will have the same barcode regardless of where it is being sold. Note that you can use a barcode scanner to automatically populate the Barcode field.
Note: Barcodes longer than 12 characters in length may not be readable by a barcode scanner.
- Enter Wholesale, Markup %, and/or Retail pricing information. If a price is manually entered in the Retail field, the Markup % adjusts to indicate the percentage above Wholesale. If Markup % is entered, the Retail Price will populate by calculating wholesale x markup %. Wholesale information is used in inventory counts, as well as purchase orders, but note that the wholesale can be changed when receiving the PO.
- Dist Prod ID: For each Distributor you added further up the form, you can enter that distributor's Product ID here. You can search for a product in by its Distributor ID anywhere you can search for a product (the Products search form, the register, Inventory screens, etc.). Purchase Orders will also display this Distributor ID if you load products into the PO by selecting an associated Distributor.
- To track inventory for the product:
- Select Yes beside Do you want to track inventory for this product? Selecting Yes makes the product available in the Stock Levels, Inventory Count, and Purchase Order lists, and exposes the additional options below.
- Choose an inventory list: This selection allows you to track retail and shop supply, as Meevo tracks on-hand values for these inventory types. The inventory type can also be used as a filter to more easily locate the product in other screens. Inventory type can be changed after saving, but only if the product or variant has an on-hand count of 0.
- Retail is for customer sale only. These products are available for sale in the register and, when sold, are deducted from the Retail on-hand count.
- Shop Supply is for professional/service provider use, but these products are available for sale in the Shop Supplies tile of the register (as long as Not for sale is not enabled). Shop Supply products appear with blue text in the Inventory Count, Inventory Returns, Purchase Orders, Stock Levels, and PO Receival screens.
- Retail/Shop Supply products appear in the register (as one product, not two separate products) and, when sold, are deducted from the Retail on-hand count.
- Stock Level details: Configure stock level thresholds from this product using the fields in the table. See Managing Stock Levels for more information on these fields.
- Discontinued and Not for sale: For details on these options, see Marking a Product Discontinued or Not For Sale.
- Exclude from all point promotions: When enabled, purchases of this product or product variant will not accrue points from a promotions.
- This product lasts ___ weeks with suggested use: This setting determines two things:
- How long after purchase the product appears in the client's Product Recommendations in the register: A product appears in Product Recommendations if it is 2 weeks or less from running out (based on this setting) and, unless purchased, remains in that list for 26 weeks beyond this setting. If purchased, the product disappears from the list by the next business day. Note that Discontinued, Not for Sale, and refunded/voided products still appear in this tile, if applicable.
- How often Product Purchase Reminder notifications are sent for this particular product. You can set this option to 0 if you do not want purchase reminders to be send for this product.
- Select the floor locations where you can find this product: Select a Floor Location and select Add, and repeat this step as needed. You can use Floor Locations as a filter when creating various inventory lists.
- When finished, select Save.
To edit a product
- Locate the product and select it.
- Select Edit, and then make your changes.
- If you are toggling Does this product come in various colors, sizes, etc. to Yes, you will need to create variant attributes and values, and then select a variant to designate as the one you've been selling up to this point. The variant you select will inherit historical data associated with the original product.
- Toggle Does this product come in various colors, sizes, etc. to Yes.
- Select Add Attribute Field and select an Attribute from the drop-down. The Variants box to the right of the field appears. Enter the values for this attribute, pressing Enter on the keyboard or keypad after each entry.
- Next, select the variant that you've been selling from the drop-down. This variant will inherit the historical data associated with the original product.
- When finished, select Generate Remaining Variants and fill in the information as needed. If you don't carry any of the variants, feel free to delete them. You can always Recover Deleted Variants from the drop-down, which lists any variants you've previously deleted.
Important: You can delete and restore variants during their creation (for example, if editing a product and toggling the variant switch to Yes, or if adding additional variants to an existing product). After saving a product with variants, those saved variants cannot be deleted.
- If you are changing the Inventory Type, note the product or variant must have an on-hand count of 0.
- When finished, select Save.
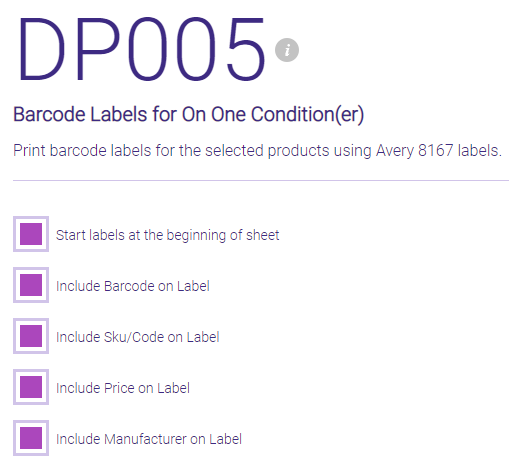
To print a product's barcode labels
- Select Print Barcode Labels while not in Edit mode. The Print Barcode Labels window appears.
- Select which products (if there are variants) and how many labels of each to print. By default, the quantity matches the product's current on-hand count.

- Select Print to open the DP005 report for the selected barcodes, and run the report to get a printable version of the barcode labels.