MA202: Hours Available to Sell
The MA202 displays a breakdown of employees scheduled, bookable hours and how many of those hours are available to sell (HATS), as well as a breakdown of cancellation and no-show hours that were not resold.
Report definitions
Important Details About this Report
- In the "Sched. Hrs. Sold" column, a service that is double-booked with another service will only count once. The same is true of Blocks; in the "Sched. Hrs. Blocked" column, a Block that is double-booked by another Block will only count once. However, note that if the Service is double-booked by a Block (or vice-versa), both will count towards Scheduled Hrs Sold.
- Services that are booked into an employee's off-time will only count for the time the employee was scheduled as bookable.
Bookable Time
- Scheduled Hours: Total bookable scheduled hours
- Avg. Scheduled Hrs / Week: (Scheduled Hours) / (Weeks Analyzed)
Appointment Book Information
- Sched. Hrs. Sold: Scheduled bookable time that is occupied by service steps configured as Servicing or Other.
- Sched. Hrs. Blocked: Scheduled bookable time that is not counted as Sched. Hrs. Sold but that is occupied by any kind of block.
- Hrs. Available to Sell: Scheduled bookable time that is not booked or blocked.
(Scheduled Hours) – (Sched. Hrs. Sold) – (Sched. Hrs. Blocked) - % Available to Sell: (Hrs. Available to Sell) *100 / (Scheduled Hours)
- canceled Appt Hours Not Resold: Scheduled bookable time that contained at least one appointment that was canceled and that was not resold. For example, an appointment that was booked from 3pm-4pm and then canceled and not rebooked would count for 1 hour of unsold time here. If a 30 minute appointment was booked anywhere in that time slot, it would instead count for 0.5 hours of unsold time, and so on.
- No Show Hours Not Resold: Scheduled bookable time that contained at least one no show (but not a canceled appointment) that was not resold. To resell a no show, you must double-book over the no-show appointment. canceling the no-show appointment and then reselling the time will place it in the canceled Appt Hours Not Resold bucket.
Setting up the MA202 report
- Type MA202 in the Convobar, or go to Meevo > Reports > Analytical, and then select the MA202 report.
- Select a date or date range for running the report:
- To run a report for a specific date range, select Custom and specify the Start Date and End Date for the report.
- Otherwise, select a predefined date or range (Yesterday, This Week, Last Week, etc.).
Note: If you select a predefined range (a date other than Custom), you can still change the Start Date and End Date. Doing so automatically changes the date range to Custom.
-
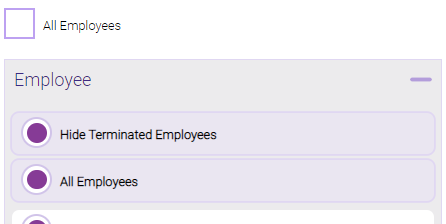
All Employees: Enable this checkbox to run the report for all employees within the date range. This includes active, inactive (including terminated), and deleted employees. Or, to run the report for specific employees, deselect the checkbox and use the drop-down to select employees or Employee Categories. You can show or hide inactive employees in this list, but deleted employees will never appear here. Note the All Employees "bubble" in the Employee list selects all employees in that list; it is not the equivalent of selecting the All Employees checkbox.

Note: Selecting All Employees will also return any data tied to the House employee.
Running the report
- When you are ready to generate the report, select a Report Format beside the Run Report button.

- Here is a rundown of each format type:
- PDF: Each time you select Run Report with PDF selected, Meevo opens a separate browser tab that displays the PDF'ed report. Meevo remains on the setup page, so you can quickly jump back over to Meevo to run more date ranges or other reports. Each PDF report you run will open its own browser tab, so you can easily review and compare reports by simply jumping between browser tabs.
- HTML: This is our original legacy format, which opens the report within Meevo. All of the functionality within that report is still there and available via the toolbar.

- XLSX: Each time you select Run Report, your browser auto-downloads the report in .xlsx format. Select the downloaded file in the browser footer to open the spreadsheet.
- Select Run Report to generate the report in your chosen format. Depending on the type of report and criteria you entered, this process may take a few minutes.